上一篇文章我们在单台服务器安装并启动了3个Mysql实例,端口分别为,3306、3307、3308,本文我们基于上篇的环境配置mysql主从同步:
主(master):3306
从(slave):3307
从(slave):3308
配置主服务器(3306)
1.首先分别登陆三个mysql实例 ,创建三个数据库,以供测试。
create database test_db;
在3306数据库创建一个用于同步数据的用户:
mysql>grant replication slave on *.* to 'slaveuser'@'127.0.0.1' identified by '123456';
mysql>flush privileges;
2.编辑/etc/my3306.cnf文件
[client]
port = 3306
socket = /tmp/mysql3306.sock
default-character-set=UTF

#主数据库master

basedir = /usr/local/mysql

datadir = /www/mysqldata3306

port = 3306

pid-file = /www/mysqldata3306/mysqld.pid

socket = /tmp/mysql3306.sock

character_set_server=utf8

#服务id
server-id=1

#启用二进制日志-必须开启
log-bin = mysql-bin

#需要同步的数据库
binlog-do-db = test_db

#不需同步的数据库
binlog-ignore-db=information_schema
binlog-ignore-db=mysql
3.重启3306端口的mysql服务
#使用我们上篇写的脚本停止服务,也可直接查看pid然后Kill
sh mysqlStop.sh 3306
#启动
mysqld_safe  --defaults-extra-file=/etc/my3306.cnf --datadir=/www/mysqldata3306 --user=mysql &
重启后查看日志是否正常启动,然后登录3306,查看主库master信息
#登录取mysql
sh mysqlLogin.sh 3306
#在mysql命令行界面执行
show master status\G
得到如下信息,记住file和position的值,等会配置丛库要用:
*************************** 1. row ***************************
             File: save-bin-log.000004
         Position: 1958
     Binlog_Do_DB:
 Binlog_Ignore_DB:
Executed_Gtid_Set:
1 row in set (0.00 sec)
配置从服务(3307、3308)
1.停止3307服务,编辑/etc/my3307.cnf
[client]
port = 3307

socket = /tmp/mysql3307.sock

default-character-set=UTF

[mysqld]

basedir = /usr/local/mysql

datadir = /www/mysqldata3307

port = 3307

socket = /tmp/mysql3307.sock

character_set_server=utf8

pid-file = /www/mysqldata3307/mysqld.pid

####从库设置############

server-id = 2

log-bin="/www/mysqldata3307/salve-bin-log"

#不需要备份的数据库;
replicate-ignore-db=information_schema
replicate-ignore-db=mysql

#需要备份的数据库
replicate-do-db=test_db
log-slave-update=1

#2天自动清理日志
expire_logs_days=2

sql_mode=NO_ENGINE_SUBSTITUTION,STRICT_TRANS_TABLES

[mysqld_safe]
log-error=/www/mysqldata3307/mysqld.log
2.停止3308服务,编辑/etc/my3308.cnf
配置同上、将 server-id改为3 ,所有3307改为3308
3.启动3307 ,并登录,设置丛库相关信息
首先停止slave
#先停止slave
mysql> stop slave;
Query OK, 0 rows affected (0.00 sec)
#设置相关信息
mysql> change master to
   -> master_host='127.0.0.1',
   -> master_user='salveuser',  //在主库设置的slave用户
   -> master_password='123456', //在主库设置的密码
   -> master_log_file='mysql-bin.000004',   //注意这里对应刚刚在主库查询到的master status信息中的 file
   -> master_log_pos=1958;  //注意这里对应刚刚在主库查询到的master status信息 中的position
#启动slave
mysql> start slave;
Query OK, 0 rows affected (0.00 sec)

#查看slave 状态
mysql> show slave status\G
*************************** 1. row ***************************
 Slave_IO_State: Waiting for master to send event
 Master_Host: 127.0.0.1
 Master_User: saveuser
 Master_Port: 3306
 Connect_Retry: 60
 Master_Log_File: mater-bin-log.000004
 Read_Master_Log_Pos: 1958
 Relay_Log_File: mysqld-relay-bin.000008
 Relay_Log_Pos: 2125
 Relay_Master_Log_File: mater-bin-log.000004
 Slave_IO_Running: Yes
 Slave_SQL_Running: Yes
 Replicate_Do_DB: test_db
 Replicate_Ignore_DB: mysql
 Replicate_Do_Table:
 Replicate_Ignore_Table:
 Replicate_Wild_Do_Table:
 Replicate_Wild_Ignore_Table:
 Last_Errno: 0
 Last_Error:
 Skip_Counter: 0
 Exec_Master_Log_Pos: 1958
 Relay_Log_Space: 2350
 Until_Condition: None
 Until_Log_File:
 Until_Log_Pos: 0
 Master_SSL_Allowed: No
 Master_SSL_CA_File:
 Master_SSL_CA_Path:
 Master_SSL_Cert:
 Master_SSL_Cipher:
 Master_SSL_Key:
 Seconds_Behind_Master: 0
Master_SSL_Verify_Server_Cert: No
 Last_IO_Errno: 0
 Last_IO_Error:
 Last_SQL_Errno: 0
 Last_SQL_Error:
 Replicate_Ignore_Server_Ids:
 Master_Server_Id: 1
 Master_UUID: b019fc43-70e7-11e7-b86c-00163e063f95
 Master_Info_File: /www/mysqldata3307/master.info
 SQL_Delay: 0
 SQL_Remaining_Delay: NULL
 Slave_SQL_Running_State: Slave has read all relay log; waiting for the slave I/O thread to update it
 Master_Retry_Count: 86400
 Master_Bind:
 Last_IO_Error_Timestamp:
 Last_SQL_Error_Timestamp:
 Master_SSL_Crl:
 Master_SSL_Crlpath:
 Retrieved_Gtid_Set:
 Executed_Gtid_Set:
 Auto_Position: 0
1 row in set (0.00 sec)
看到
Slave_IO_Running: Yes
Slave_SQL_Running: Yes
即为配置成功
4.启动3308配置相关信息
具体操作同第3步
5.测试主从同步是否正常
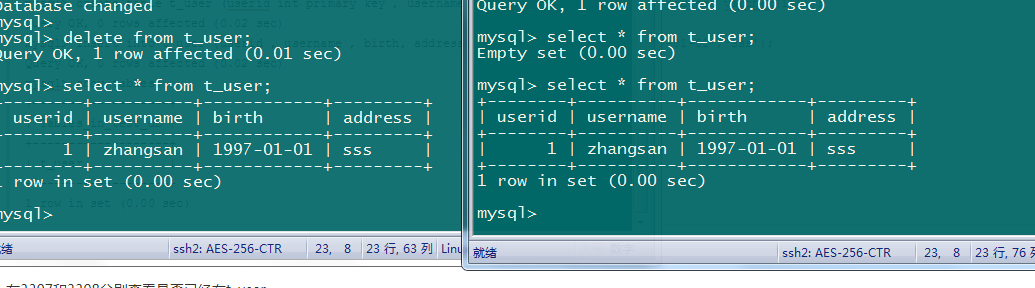
在主库中创建一个测试表t_user并插入一条数据:
mysql> use test_db;
Database changed
mysql> create table t_user (userid int primary key , username varchar(20) , birth date , address varchar(100));
Query OK, 0 rows affected (0.02 sec)
mysql> insert into t_user (userid , username , birth, address) values (1,'zhangsan','1997-01-01','sss');
Query OK, 0 rows affected (0.02 sec)
mysql> show tables;
+-------------------+
| Tables_in_test_db |
+-------------------+
| t_user            |
+-------------------+
1 row in set (0.00 sec)
在3307和3308分别查看是否已经有t_user